
Are you looking for a simple, inexpensive and discrete method to magnetize your model bases? Article 3 from The Forge will demonstrate how to do this.

My previous article from The Forge demonstrated how to build movement trays. Built with sheet metal, they are ready to accept models with magnetic bases. Now I’ll show you how to get that done.
Tools and supplies needed: Miniature base, rare earth magnets, superglue, spackling paste, and hobby knife.
Time needed: One session of 15 minutes or so for infantry models.
Select a model to be magnetized. Here is an infantry model on a 20 mm base.

We will use the void underneath the base to seclude a rare earth magnet.

Apply a dab of superglue to secure the magnet

Place a rare earth magnet small enough to hide in the void. For this Games Workshop base, an N48 Neodymium disc magnet does the job. They measure 6 mm in diameter and 2 mm in thickness. I purchase mine on eBay. You don’t need to worry about magnetic polarity for this method. Place the magnet on either face. Allow a few minutes for the glue to dry.

Locate a supply of spackling paste. Do not use lightweight spackling paste. It is too dry to work with.

Use a tool to fill the void with paste.
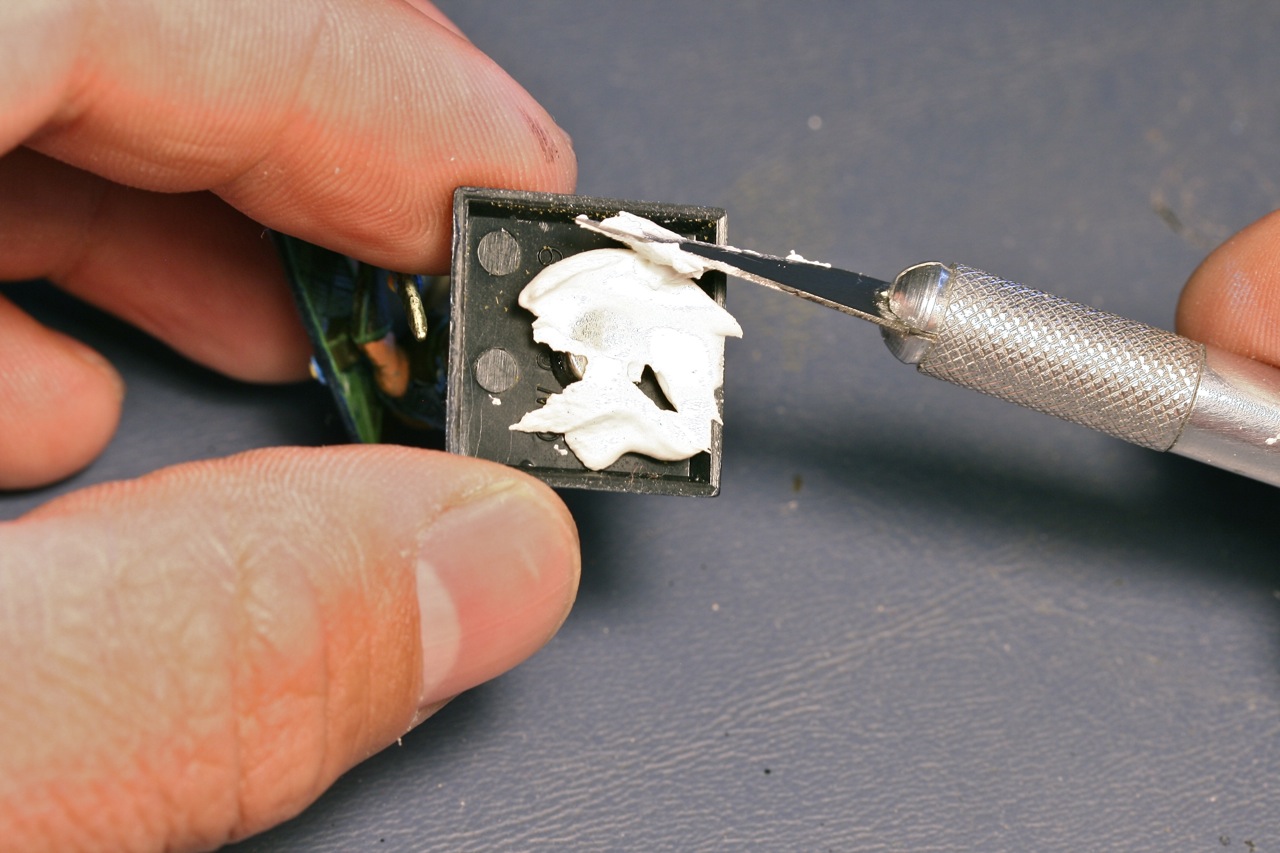
Level off the paste. This allows the model to stand flat on a surface. I usually use a toothpick. Do not remove too much paste that you can see the bare metal of the magnet. You want it covered completely.

Once it is dry, you are finished. That was easy!
Caution! Do not attempt to place the model on a tray until the paste is fully dry. Otherwise the magnet may completely separate from the base, and you will have to start over.

Let me answer two questions that I know some of you may have.
Why rare earth magnets and not craft-grade sheet magnets? I prefer a magnet that is strong enough that will hold a model on the tray even if it turned upside down. I would not trust a sheet magnet to do the job, especially with a heavy pewter model.
Why the spackling paste? The rare earth magnet I used is actually very strong. Recall that I build my movement trays out of sheet steel. The magnetic force to the tray is strong enough that the magnetic disc can often break free from the superglue and the plastic base. The paste, when dried, helps attenuate the magnetic pull, and physically restrains the magnet to the plastic base.
What I really like about this method is that the magnetic modification is completely hidden. The model height does not change.

Unless I showed you, you would never know it was there.

And Yes, they stick to the movement tray with no troubles whatsoever. My bowmen models are all pewter. Yet, they are no trouble for the magnets. They can hang upside down, I can slide them around the game table, they can sit in a box in the car and they will never budge. They only come off when I want them to.

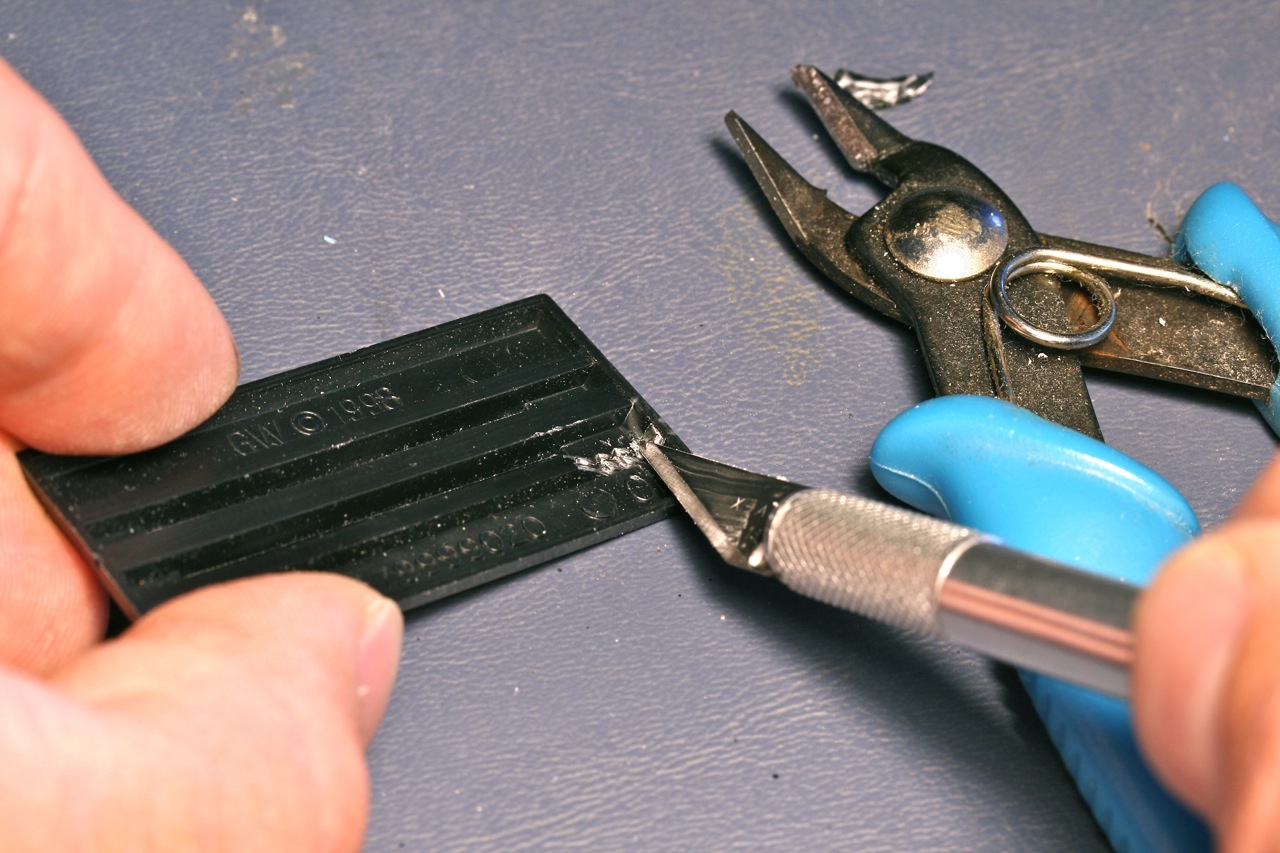
What about cavalry models? I knew you were wondering. I basically adapt this same method to any base that I encounter. Looking at the Games Workshop cavalry base below, the disc does not fit any of the voids available. What to do?

I simply make it fit. In this example, let’s remove some of the plastic to allow a disc to fit underneath. Here, you will use a common diagonal cutter to remove some plastic base material.

Shave the surface down as flat as you can. The cleaner the surface, the better the magnet will fit under the base.
For cavalry, make room for two magnets, especially if you are like me and want to perform upside-down tests with your models. Use this concept for all other sizes of bases. Use as many magnets as will properly hold your model to the tray. Once again, you do not need to worry about magnetic polarity even for different magnets on the same base.

Fill in the void with paste. For this reason, I like to have my cavalry mount inserted into the base before I perform this step.

Two magnets hold the beast with no problems.

What about the mount plus the rider? Still no problems. And, Yes, my riders are also magnetized to my mounts. You could say that I have way too much fun with magnets. I can’t resist. Magnets are such a cheap way to enhance your modeling products.

As of this article publishing date, I have magnetized over 200 models of infantry and cavalry using this method. Every Warhammer model I create gets magnetized this way. So far, I’ve only had two magnets that have broken free from the glue and paste. That’s less than 1% of failure. I haven’t needed to remove all the old paste to make the repairs. Just glue the magnet back down where it was, seal it over again with paste, and let it all dry. The repairs have been holding.
Well, that wraps up this article, which was part 2 of creating magnetic movement trays and model bases. I hope this method works well for you.
However, I am planning a 3rd article in this series. Stay tuned for another article where I will show you how I make magnetic storage boxes for my models. Using this easy method, you can transfer units, marshaled on their movement trays, directly from their storage box to the gaming table without any additional setup. And since the box is magnetized you can carry them, or set them in your car and not worry about your units sliding around in transit. This will be my next article from The Forge. See you then!

Happy Wargaming!

This article made me laugh after I cried a bit, when I magnetised my minis the magnets came off, now I know why! Thank you for sharing. Also enjoying your videos on YouTube, I am itching to start the rest of my WHFB armies I have recollected…. I started in third edition so have lots of rules options to use!
All the best
Lee
LikeLike
It’s crazy how strong those magnets are. I’m pleased to hear some feedback and to connect with others in the hobby.
LikeLike